Desk cable trays solve one boring problem that gets annoying every day: power bricks, extension blocks and monitor leads slipping onto the floor. Good desk cable tray installation does not make your setup look like a showroom. It just keeps the messy, heavy, snag-prone part of the desk where it belongs, which is under the desktop and out of your feet.
In This Article
- Why Desk Cable Trays Are Worth Fitting
- Desk Cable Tray Types Compared
- How to Choose the Right Size and Fixing
- Desk Cable Tray Installation Steps
- Cable Routing for Sit-Stand Desks
- What to Buy in the UK and What to Spend
- Common Cable Tray Mistakes to Avoid
- Frequently Asked Questions
Why Desk Cable Trays Are Worth Fitting
A tray is not the glamorous bit of a desk setup, but it is one of the few accessories that fixes several small problems at once. It gets the extension block off the carpet, stops charger bricks dangling from sockets, and makes the floor easier to vacuum. If you have a sit-stand desk, it also stops cables pulling tight every time the desk moves.
The main win is control. Loose cables have a habit of catching on chair wheels, footrests, bags and vacuum cleaners. The HSE’s display screen equipment guidance is mainly about workstation comfort, but it also makes the wider point that a workstation should be assessed as a real working environment, not just a chair-and-screen problem. Cable clutter is part of that environment.
What a tray actually does
A desk cable tray gives you a fixed channel for the heavy bits, which is why it belongs in the same practical category as a good desk accessory that actually earns its place rather than a cosmetic extra:
- Extension block: kept off the floor and away from feet.
- Power bricks: supported instead of hanging from sockets.
- Long cable runs: coiled loosely in one place rather than wrapped tightly around monitor arms.
- Spare slack: stored safely for a sit-stand desk or laptop dock.
That is different from a cable sleeve. Sleeves make visible wires look tidier, but they do not support the weight of the extension lead or power adaptors. A tray does.
When you do not need one
If your desk has one laptop charger and nothing else, a small adhesive cable clip or a £6-£10 pack of Velcro ties from Amazon UK will do. A tray starts making sense once you have a monitor, lamp, speaker, dock, charger and extension block all fighting for the same space.
The other reason to fit one is cleaning. A cable nest under the desk collects dust quickly, especially in carpeted bedrooms and spare rooms. Lifting everything into a tray makes the space feel less temporary, even if the desk itself is still an IKEA top on budget legs.
Desk Cable Tray Types Compared
Desk cable trays come in a few basic forms. The right choice depends on how permanent you want the fitting to be, how heavy your cable load is, and whether you are allowed to screw into the desk.
Screw-fixed metal trays
This is the strongest option. A metal basket or tray screws into the underside of the desktop and can usually hold a 4-way or 6-way extension lead plus several cables. Expect to pay about £18-£35 from Amazon UK, Screwfix or specialist office suppliers, with wider premium versions around £40-£60.
I would choose screw-fixed metal for most fixed desks and heavier sit-stand setups. It feels less clever than adhesive strips, but it stays put.
The catch is desk material. Solid wood, plywood and decent MDF usually take screws well if you pre-drill. Cheap hollow-core desktops are riskier because there may be very little material for the screws to bite into.
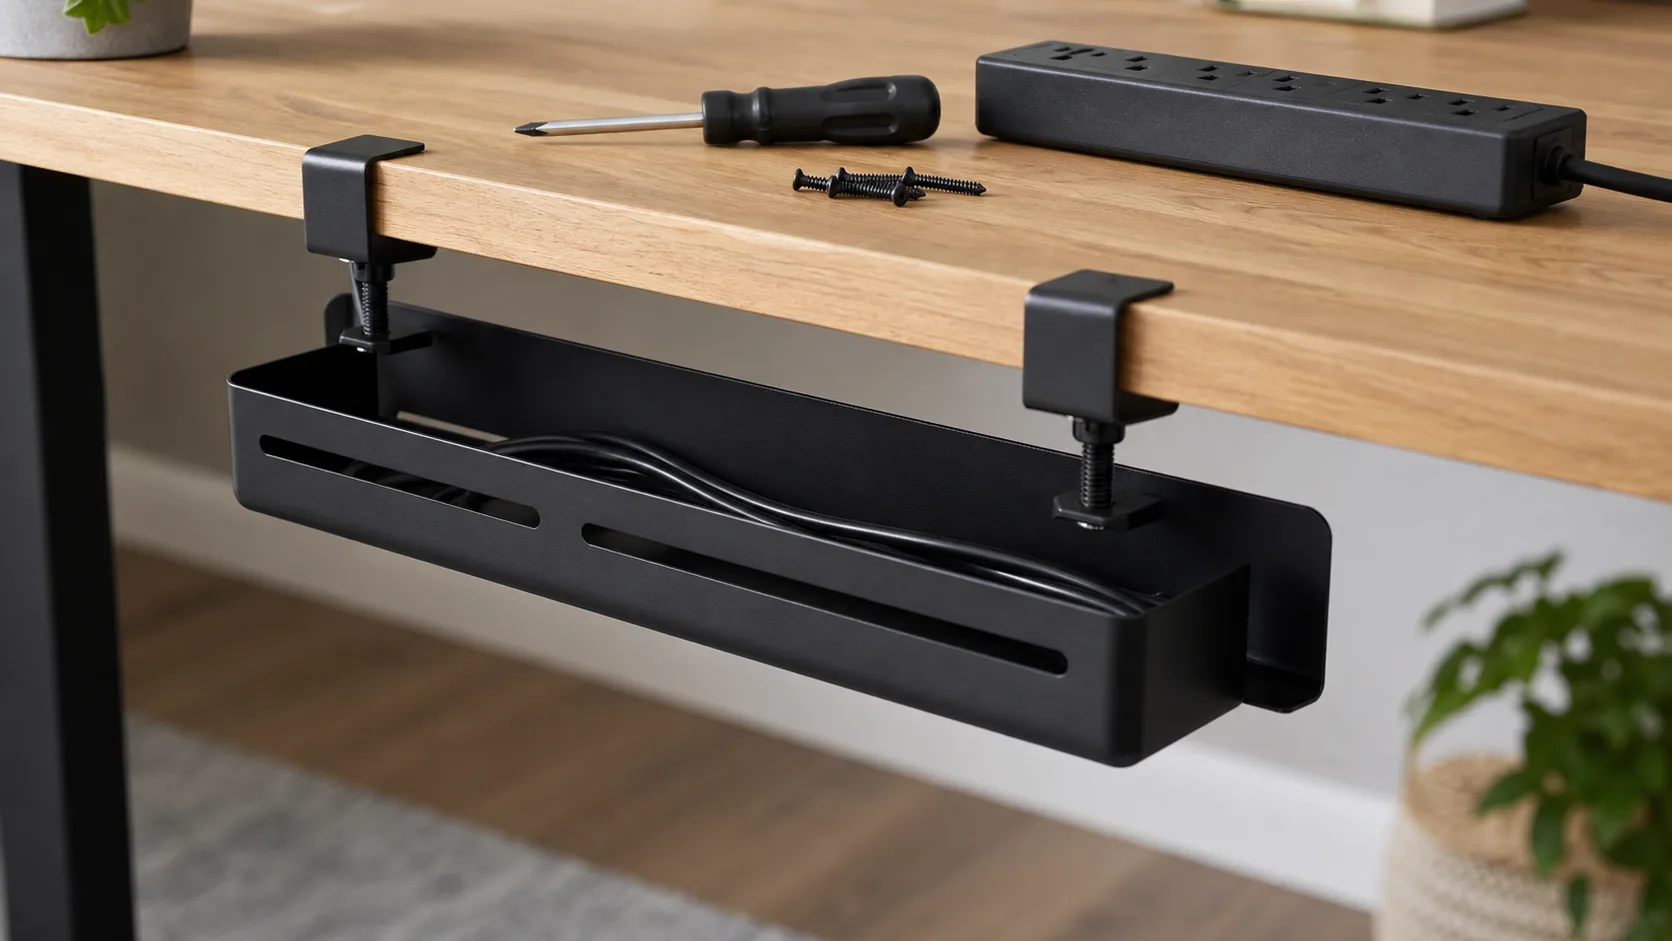
Clamp-on trays
Clamp-on cable trays grip the back or side edge of the desk. They are useful for renters, glass-top desks where drilling is out, or anyone who changes desks often. The good ones cost about £25-£45 in the UK.
The downside is clearance. A clamp can clash with monitor arms, wall-facing desks, modesty panels and some standing desk frames. Check the clamp depth before buying. If the desk sits hard against the wall, a clamp-on tray may force it forward by a few centimetres.
Adhesive trays and raceways
Adhesive cable trays look tempting because there is no drilling. They can work for lightweight USB leads and a small power brick, but I would not trust one with a loaded 6-way extension block under a desk used every day.
Heat, dust and textured desktop undersides all weaken adhesive pads. If you do use one, clean the underside with isopropyl alcohol first and keep the load light. For a rental desk, adhesive trunking along the back edge is often better than trying to suspend a heavy tray.
Cable boxes and floor units
A floor cable box hides the extension block rather than mounting it under the desk. The D-Line cable tidy unit at Screwfix is about £17 and is useful if you cannot drill or clamp anything. It is tidy enough for a living room desk and keeps plugs together.
It does not solve every problem, though. You still have cables running from the floor to the desk, so chair wheels and sit-stand movement remain an issue. I see floor boxes as a fallback, not the best answer for a proper work desk.
How to Choose the Right Size and Fixing
The mistake is buying a tray based on length alone. You need to know what it will hold, where it will sit, and what the underside of your desk allows.
Measure the actual cable load
Before ordering anything, put your extension block, laptop charger, monitor power brick and dock where you think the tray will go. Measure the space they need as a group. Then add room for loose bends rather than tight coils.
For most home offices, these rough sizes work:
- Small tray, 40-50cm: one laptop charger, one monitor cable and a compact 4-way extension lead.
- Medium tray, 60-75cm: the best fit for most desks, with room for a 6-way extension block and several device cables.
- Large tray, 90cm plus: useful for dual monitors, speakers, docks and sit-stand desks with more slack.
The IKEA SIGNUM-style 70cm metal tray is popular because that size hits the useful middle ground. It is long enough for a normal extension lead but not so wide that it fights the desk frame.
Check desktop thickness
Screw length matters. You want enough bite to hold the tray, but not so much that a screw comes through the top of the desk. On a 25mm desktop, a 12-16mm screw is usually safer than the longest screw in the packet.
Do not guess on a thin desktop. Measure it. Budget flat-pack tops can be thinner than they look at the edges, and some have hollow sections. If the top feels light for its size, avoid mounting a heavy loaded tray in the centre without checking the construction.
Leave access for plugs
A tray that hides everything too well becomes annoying. You still need to reach the switch on the extension block, unplug a charger, or reset a dock. Mount the tray far enough back to hide the cables from normal view, but not so far that every change needs a torch and a yoga pose.
On a deep desk, I like the tray just behind the centre line. It hides well, balances the cable drop from monitors, and leaves enough room for your knees.
Desk Cable Tray Installation Steps
Install the tray with the desk unplugged and cleared. It sounds obvious, but desk cable tray installation is much easier to do neatly before everything is live and tangled. If you are working under a heavy sit-stand desk, lower it to a comfortable height and give yourself enough light.
Tools and parts
You normally need:
- Tape measure: for centring the tray and checking desk thickness.
- Pencil or masking tape: for marking screw holes without staining the desktop.
- Drill with small pilot bit: useful for screw-fixed trays.
- Short screwdriver: easier under a desk than a full-length one.
- Velcro cable ties: better than plastic zip ties because you can reopen them.
For prices, allow about £5-£8 for Velcro ties, £6-£12 for cable clips, and £15-£25 for a decent 4-way or 6-way surge-protected extension lead from Screwfix, Currys or Amazon UK. If the cable count is growing because you have added a dock, check the separate docking station buying guide before blaming the tray.
Installation steps
- Unplug everything first. Do not install around live extension blocks or trailing charger bricks.
- Choose the tray position. Hold it under the desk with the extension block inside and check knee clearance, wall clearance and cable routes.
- Mark the fixing points. Use masking tape if the underside is dark or textured.
- Drill pilot holes if needed. Use a small bit and stop well short of the desktop surface.
- Fit the tray loosely first. Start all screws before tightening them so the tray does not twist.
- Place the extension block in the tray. Keep the switch visible if you use it daily.
- Route power and data cables separately where practical. You do not need perfection, just avoid everything being pulled into one tight bundle.
- Create gentle loops. Avoid sharp bends around the tray edge, especially for USB-C, HDMI and power cables.
- Test the desk movement and chair clearance. Move the chair, raise the desk if applicable, and check nothing snags.
That final check matters more than the neatness photo. A cable tray that looks perfect but pulls on your monitor cable when the desk rises is a failed installation.
Cable Routing for Sit-Stand Desks
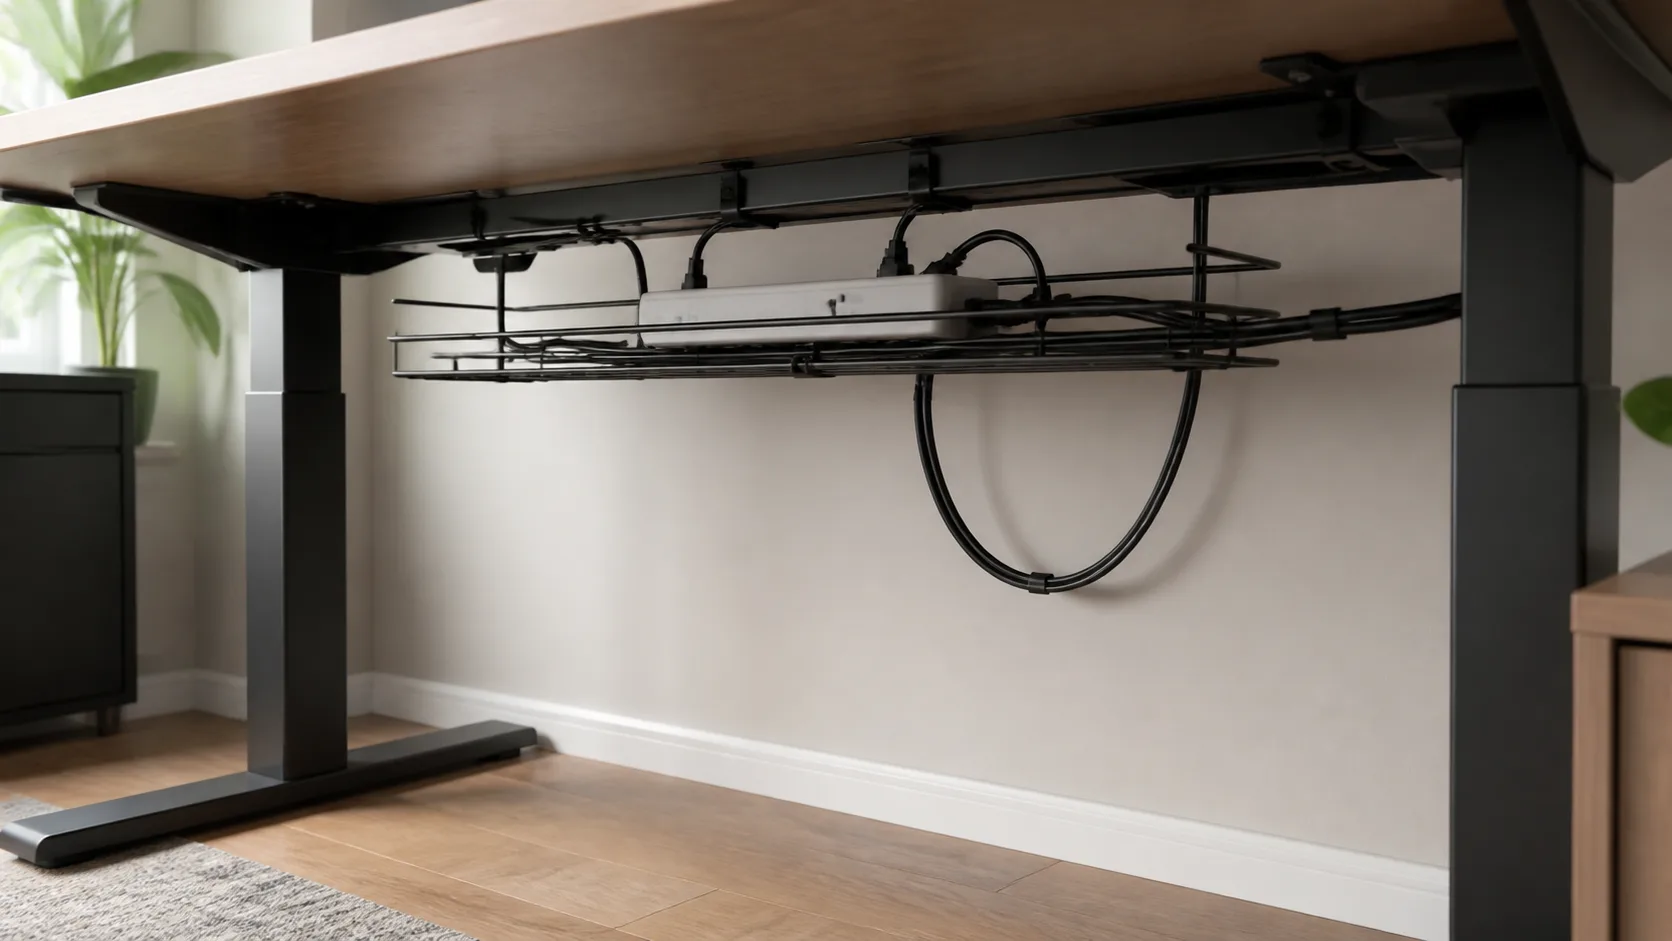
Sit-stand desks need slack. Fixed desks can get away with tidy short runs, but a height-adjustable desk has to move without tugging the wall socket, monitor arm, dock or laptop charger.
Build in a service loop
A service loop is just spare cable length arranged deliberately. It should hang or curve gently enough to cover the full height range of the desk. If the desk goes from about 70cm sitting height to 120cm standing height, you need enough free cable for that 50cm movement plus a little margin.
Do not coil the mains lead tightly around the tray. Keep it loose and visible. If a cable gets warm in use, it needs air around it. Electrical Safety First has clear advice on avoiding overloaded sockets and checking extension lead ratings, and that matters when all your desk power ends up in one place.
Keep the wall lead simple
The wall-to-desk lead should be the cleanest part of the setup. One good extension lead into the tray is better than two cheap extensions joined together. Daisy-chaining extensions is a bad habit because it hides the real load and increases the chance of overheating.
If the wall socket is too far away, buy a longer, properly rated extension lead rather than joining two short ones. A 2m or 3m extension is usually enough for a UK home office; if you need more than that, rethink the desk position.
Separate moving and fixed cables
Monitor power, monitor data, dock power and laptop charging cables move with the desk. The wall socket lead partly stays fixed. Treat those as different routes. Tie moving cables to the desk frame lightly, then let the main service loop drop in a controlled way. This is especially important if your desk already has the wobble and collision risks covered in the standing desk mistakes guide.
After routing, run the desk through its full height range twice. Listen and watch. Clicking, stretching or sudden cable movement means something is too tight.
What to Buy in the UK and What to Spend
For desk cable tray installation, I would not chase the cheapest no-name tray unless the desk is temporary. The tray is holding power gear above your knees, so the bracket and fixing quality matter.
Budget picks
At the budget end, the IKEA SIGNUM-style metal tray is the classic choice. UK availability and pricing move around, but expect roughly £10-£20 when bought from IKEA or resale stock. It is basic, open, and easy to cable-tie through. It pairs well with a simple screen setup; if the cable mess is mainly from ports and peripherals, the USB hub explainer may save you buying more hardware than you need.
For very light setups, adhesive cable clips and reusable ties from Amazon UK are fine at about £6-£12 total. That is enough for a laptop-only desk, not a dual-monitor setup with a heavy extension block.
Mid-range picks
This is where most people should shop. A screw-fixed D-Line under-desk cable management tray is commonly around £30-£35 on Amazon UK, and similar metal basket trays sit in the £20-£40 range. Look for a steel tray, open sides, included template, and enough width for your extension block.
For a non-drill option, a clamp-on tray at about £25-£45 is worth paying for if the clamps are metal and the tray does not flex when loaded. Cheap clamp trays often look fine empty, then sag once a power strip and charger bricks go in.
Premium and standing-desk setups
Premium cable management kits from standing-desk brands can cost £50-£90, especially when bundled with cable spines, magnetic clips or under-desk raceways. They are not always better value, but they can be neater on exposed sit-stand frames. On heavier frames such as the one covered in the UPLIFT Desk V2 review, the cable tray needs to clear the crossbar and any control box.
If I were fitting a normal home office desk, I would buy a medium screw-fixed metal tray for about £30 and a pack of Velcro ties. For a rental desk where drilling is not allowed, I would buy a clamp-on tray before trusting adhesive to hold real weight.
Common Cable Tray Mistakes to Avoid
Most bad cable tray installs fail in boring ways. The tray is too small, mounted in the wrong place, overloaded, or so tightly tied that it becomes hard to change anything later.
Mounting it too far back
Pushing the tray hard against the rear edge hides it well, but it can make access miserable. You may also run into wall clearance if plugs exit backwards. Leave enough room to reach the extension block and unplug devices without removing the tray.
Using zip ties everywhere
Zip ties look neat once. Then you change your monitor, add a dock, swap a charger, or move the desk. Use reusable Velcro ties for anything you may change. Save plastic zip ties for fixed, low-voltage runs that will stay untouched.
Ignoring heat and load
Do not pack a tray so tightly that power adaptors are buried under other cables. Laptop bricks and monitor power supplies can run warm. Give them air, and avoid covering vents or trapping them against carpet.
Also avoid treating the tray as permission to add more devices to the same extension lead. Cable management tidies the mess; it does not increase the safe electrical load.
Forgetting future changes
Leave one spare route. You will add something later: a webcam, light bar, speakers, charger, USB hub or docking station. If the tray is already full on day one, it is too small.
This also matters if you use monitor arms. Arms move. Cables need enough slack for screen adjustment without pulling at ports. A neat setup should still be serviceable, particularly on a multi-screen desk like the ones discussed in the multiple monitors desk guide.
Frequently Asked Questions
Are desk cable trays worth it? Yes, if you have more than a laptop charger. A tray keeps the extension block, power bricks and spare cable off the floor, which makes the desk safer, easier to clean and less annoying to adjust.
Can I fit a cable tray without drilling? Yes. Clamp-on trays are the best no-drill option for most desks. Adhesive trays can work for light cables, but I would not use one to hold a loaded 6-way extension block.
Where should a desk cable tray go? Fit it under the desktop, usually just behind the centre line. It should be hidden from normal view but still reachable when you need to unplug something.
How much weight can a desk cable tray hold? It depends on the tray and the desk material. Many metal trays can handle an extension block and several cables, but the fixing into the desktop is often the weak point. Check the manufacturer’s stated load limit.
Can I put an extension lead in a cable tray? Yes, that is one of the main uses. Keep it accessible, avoid overloading it, and do not plug one extension lead into another.
Do standing desks need a different cable tray? Not always, but they do need better cable routing. Choose a tray with room for a service loop so the desk can rise and lower without pulling on the wall socket or monitor cables.